

 Spent most of the weekend in my ‘bubble’. HURRAY!!!! I worked on Mary Lee’s thankful cards, colored in stamped images of cupcakes using my new Copic markers, and colored in stamped Halloween images. There is a process to some of these cards and like fine wine, the process cannot be rushed. Take the cupcakes for example, I stamp the image, color them in with markers, then add an acrylic finish – let that dry – then go back and add ‘sprinkles’ of glitter – then the glitter needs to dry. So in between making Mary Lee cards I would ‘make’ a cupcake…closest thing to baking I’ve done in a long time.
We went to the local theatre production of Chicago last night. Three Briar Cliff students were in the cast so I felt compelled to attend. I don’t like the play, don’t like the music, don’t like the movie, but I went anyway – just to show my support. They did a good job – the entire cast. The sets were wonderful. Whoever was in charge of costumes – ick – they were BAD.
Now for the scoop on the cards.
Post-It Card
The only thing unique here is that I used an actual lined post-it note and punched the top using a notebook punch from Stampin' Up. I stamped the list of words using an assortment of stamps from JustRite Stampers. Last year I ordered a batch of stamps from their dollar bin. I don't use them all the time - but I do like the size and variety. I did use several of the words on those damn mini-scrap books I made for the 3/5's Club... I'm NOT taking my carmera this year on vacation. I don't want to be tempted to try another scrapbook marathon!
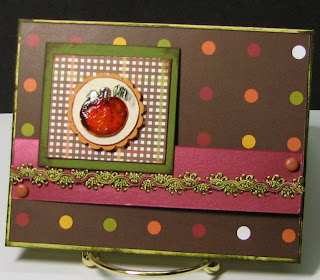
Pumpkin Card
Oh - you should see this one in real life!
~Base card is light green from PaperTrey - edges smudged with olive green
~Layer of brown dots paper 'the goods' from American Crafts
~The braid was surprise present from Sista Gail (good job Gailey!) it is attached to a cranberry color metallic sheen cardstock
~Two rust color brads
~The top pumpkin image was a stamp I found in a box somewhere... I colored in the pumpkin using Copics, then layered it with a Crackle Accents from Ranger and added a coil of green metal wire.
~The pumpkin is attached to a circle of vanilla confetti, then attached to a scallop (die punch).
~These were attached to a square of coordinated paper 'the goods' from American Crafts and a larger layer of olive green cardstock
Scarecrow
~The image was a bulk hodge-podge of stamps that Sissy Gail purchased on eBay. I colored him in with my new Copic markers then gave him a covering of Cracke Accent
~I smudged the background of the scarcrow with 'old paper' ink from Tim Holtz
~To give a suggestion of 'crops' for the scarecrow to be standing in - I used eyelash yarn from the $Tree
~The design paper is Wild Saffron cardstock
~The base card is from PaperTrey
Thinking of You
I messed up with this one!
I had the 'top' ready to attach to the base card - which I did - UPSIDEDOWN! So..... I tore the card at apart and reattached it so the card could actually open right to left.
~The design paper is the same as scarecrow card - just used a different corner
~The stamp is stamped onto the back of the same paper
~Ribbons and such were tied to the rectangle - then the rectangle was attached to the design paper 'Wild Saffron'
~A corner hinge brad was added as well as a paper flower by Petaloo Gailey bought this goody for me too! The 'gemstone' was already attached to the flower. I placed the flower over one of the design paper flowers
You can get up close with the cards by clicking on the images.
All good wishes,
Nancy

No comments:
Post a Comment
Thank you for taking the time to leave a note. Each is read and appreciated.